Use cases have historically been a somewhat confusing topic to venture into for me personally, and I’m now of the believe that is because they typically have a couple of definitions, depending on who you’re talking to.
They can be:
- A way of capturing business requirements of a system from the stakeholders involved. It can be a method of discovering previously unearthed requirements for a yet to be built system, or a way of documenting requirements for a system that’s already in place. It can be used on any system, be that low product requirements or high level business objectives, and doesn’t have to be technical in nature.
- In software development, use cases are used to contain application specific business rules, and interface between various portions of the system (and the user!) to get a certain task completed.
These two ideas blend into one another throughout the development process, and contain considerable overlap of ideas, whilst having a clear division of what each definition is meant to represent.
I think understanding both of these ideas is key to understanding just how powerful use cases can be. In iOS development, well-modeled use cases are the equivalent of having a well thought out UI design with all the padding and native elements laid out for you in Figma, except they model out your business requirements for the system (which, I’d argue, plays a much more important role when building out your system). We’ll dive into the more “pure code” aspect of use cases in this post, but understanding the importance of use case’s as a tool to capture requirements is just as key in my book, as the two ideas go hand in hand. Feel free to skip onto the code portion of this post if you decide thats more your thing.
Use cases as requirements gathering
Ivar Jacobson first developed sse case modelling as a method of system requirements gathering. Gathering the business requirements of the system you’re building and writing them in plain text so all stakeholders have a shared understanding of the system being built (or the system that has been built).
Templates for documenting use cases aren’t set in stone, and can be used to document a variety of details about how your system should function. Some key examples of things to document in your use cases include:
- Scope: What are the boundaries of the system you’re documenting? Where does the system start and stop?
- Primary actor: Who (or what) is interacting with this system on a primary basis? Is it a system interacting with another system, or is it a user?
- Main success scenario: What happens when the intended happy-path is taken?
- Error scenarios: What are the unhappy-paths in your system? What is the behavior when you encounter an unhappy path?
Use cases don’t intend to encasaputlate all requirements of a system. You wouldn’t want a use case for documenting data formats, external interfaces, or the underlying technology underpinning a system, for example. The aim is to depict everything the system must do in spite of all the other technical gubbins surrounding the system you’re documenting, and inform the basis of the other requirements in the system. This leads to the “Hub-and-Spoke” model of requirements.
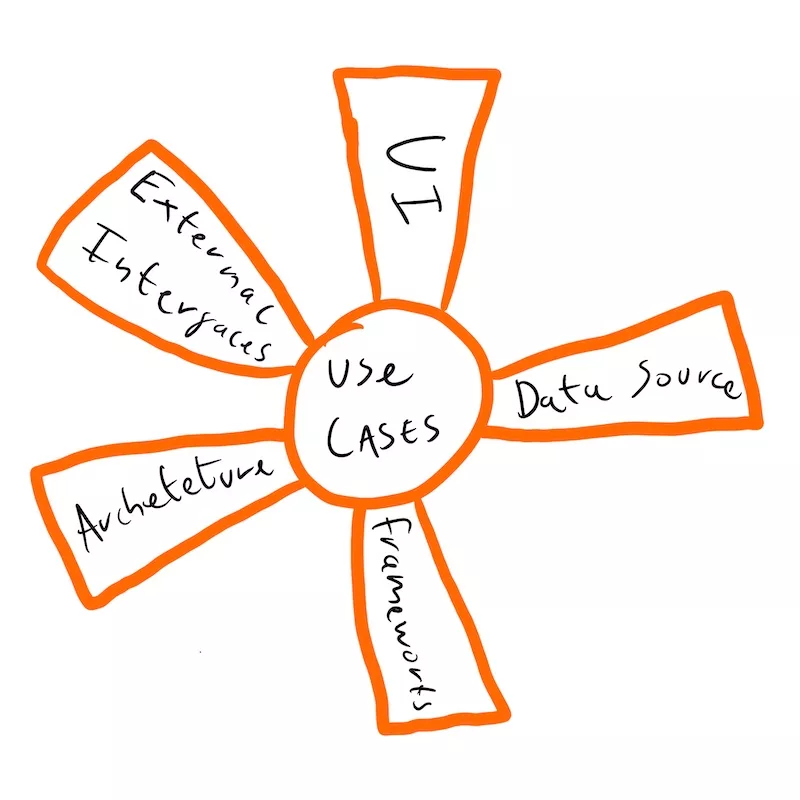
As an iOS developer, consider your UI design. Whilst specific details about the design of your UI won’t feature in your use case, your use case will be central to building out the requirements of the UI design. For example, a use case might say we need to display an error to a user if a network request fails, but it won’t document what this error will look like. Only once the functionality of the system has been documented and understood will you be able to build out UI that handles those requirements.
An example of requirements gathering
We’ll use a real world example included in my iOS Camera framework which allows users to view a preview of their selected camera and take a photo. Taking a photo is a key use case of that system, and as such, you can build a plain text use case around it. Templates for use cases are decided team by team (and is a whole other topic!), but using a template borrowed from Alistair Cockburn’s “Writing Effective Use Cases”, you might end up with something that looks like the below:
Title: Taking a photo.
Primary Actor: User of the framework.
Scope: Taking a picture with the camera framework.
Stakeholder:
- User of consumers’ app: Wants to take a picture from their phone camera.
- User of the framework: Wants an easy way to access the camera functionality of iOS.
Main success scenario:
- User starts the camera.
- User selects a camera from their device.
- User takes a picture using the selected camera.
- Framework interacts with operating system to take a photo.
- The user is given a photo of the scene they’ve taken a picture of.
Error scenarios:
- The camera hasn’t been started.
- Produce an error notifying the user the camera hasn’t been started.
- A camera hasn’t been selected.
- Produce an error notifying the user that they haven’t chosen a camera.
- The phone is unable to take a picture.
- Produce an error notifying the user that the photo isn’t able to be taken.
The above sets out the summary of the what should happen when a user takes a photo, and details the interactions that happen throughout this process. It details the successful path and what that looks like, as well as the expected error paths, and what they will look like. It stops short of defining exactly what will happen in app when those errors are returned, as that is out of our scope for the framework, and should be handled by the consumer of the framework.
This should be written by all stakeholders in the system. If this system belongs to a team, then the team should be writing this document. Whilst engineers will no doubt have an input into this, other stakeholders like QA and UX will want to be around to have their input into the functionality being drawn up. You’ll also want a representative of the business there (possibly the product lead in your team) to make sure the business needs and priorities are being accurately reflected.
This document can then be stored and act as a source of truth for the “taking a photo” feature of the Camera framework. It’s also a useful reference for all non-technical stakeholders, and for onboarding new team members about how specific systems in your product should function.
Use cases in software
Use cases in software largely aim to capture the above, but can be applied on a more macro level. Where as use cases in documentation may capture the full scope of a system, including front and back end interactions, use cases in your codebase typically capture a subset of that. They aim to encapsulate a singular application specific business task that your system depends upon. They are given all the components needed to execute that task. Like in the “hub-and-spoke” diagram above, they are central to your software design and are functionally independent of any other moving layers in your app.
A clean, screaming, hexagonal, onion…
Whilst the idea of use cases was initially put forward by Ivar Jacobson in Object Oriented Software Engineering: A Use Case Driven Approach, their position in modern software design has been bolstered with their inclusion in many a modern architecture patterns, notably:
These architectures, whilst operating with small differences in their implementation details, all aim for separation of concerns by dividing software into layers. The outcome aims to be testable, highly readable code – that isn’t tightly coupled to the existence of a singular framework. All of them contain a layer where use cases should live.
Being independent of other layers, use cases should only change when the functionality of the feature in the use case changes. Using the above example of taking a photo, the functionality of the use case should only change if there are changes to the business rules backing it. They shouldn’t change if any of the “spokes” around the use case change.
Consider the photo-taking use case above. If the UI of the photo capture screen changes, that shouldn’t have any impact on the use case. The use case should be constructed and isolated in such a way that this change should not have an impact on the use case, as the functionality of taking a photo has not changed.
Use cases also act as beacons of light in your codebase. An odd phrase to describe code, so what do I mean by that? Well, they take on the title of the specific functionality your use case is encapsulating. So if your app has the ability for a user to login to a service, then you’d perhaps design a use case around that, calling it a LoginUseCase. This sort of naming convention means that when looking at a codebase, developers can hunt down the portion of the app they’re needing to work on quicker, as specific use cases that accurately signal their functionality are easier to find in large projects (much more on this in Screaming Architecture).
Some Swift code
Skeleton design
Using the documented use case example above, we’re able to write our code based around its structure. Let’s start by creating the class containing the use case:
class TakePhotoUseCase {

}
The post-fix of UseCase isn’t essential, and is primarily a personal preference. It may be you have a directory where your use cases live and that’s how you create your “beacon of lights”.
We now create the method that will be the entry point for the use case. There is debate around whether this method should be named similarly for every use case or if it should adapt a phrase pertinent to the specifics of the use case you’re building. Again, personal preference, but I tend to fall into the latter camp as I believe it reads a bit nicer.
func takePhoto(completion: @escaping (Result<Data, PhotoCaptureError>) -> ()) {

}
We can assume taking a photo is something we might want to do off the main thread, so we provide a completion handler to hook into for when the system has finished taking a photo.
Implement the happy path
The happy path as defined above is that a user gets to take a photo. The use case is able to take in the abstracted components needed to make that happen. Defined elsewhere in the project, there is a CameraController interface that allows us to interact with certain aspects of the selected camera. On this, we’ve defined the takePhoto function.
I think it’s worth noting the iOS specific aspect of this. The CameraController ultimately boils down to an AVFoundation abstraction. This is an example of the separation of layers. It’s important for the use cases to not directly depends on the implementation details of that framework. Decoupling ourselves from AVFoundation means our use cases are shielded from any changes made to that framework.
As such, our use case now looks a bit like this, with the happy-path now working:
class TakePhotoUseCase {

    private let controller: CameraController

    init(controller: CameraController) {
        self.controller = controller
    }

    func takePhoto(completion: @escaping (Result<Data, PhotoCaptureError>) -> ()) {
        controller.takePhoto(with: settings, handler: captureHandler)
    }
}
Using the error scenarios
With the error scenarios already discussed, we can now pepper our takePhoto function to handle the error cases.
We have an interface in the code that handles the state of the camera session, CameraSession, which allows us to check to see if the camera has been started, and if a camera has been selected by the user.
So we can now check if the camera has started, and return an error if it hasn’t. Meaning the function now looks like the below:
func takePhoto(completion: @escaping (Result<Data, PhotoCaptureError>) -> ()) {
    if session.hasStarted {
        controller.takePhoto(with: settings, handler: captureHandler)
    } else {
        completion(.failure(.cameraNotStarted))
    }
}
And then we can add the step to check to see if a camera on the device has been selected, and produce an error if it hasn’t:
func takePhoto(completion: @escaping (Result<Data, PhotoCaptureError>) -> ()) {
    if !session.hasCamera {
        completion(.failure(PhotoCaptureError.noCameraSet))
        return
    }
    if session.hasStarted {
        captureHandler.set(completion)
        controller.takePhoto(with: settings, handler: captureHandler)
    } else {
        completion(.failure(.cameraNotStarted))
    }
}
The function now performs the entirety of our documented use case, with the separation of concerns policed by the abstractions of the systems we’re passing through to it. The complete use case now looks like this:
class TakePhotoUseCase {

    private let controller: CameraController
    private let session: CameraSesion

    init(controller: CameraController,
         session: CameraSesion) {
        self.controller = controller
        self.session = session
    }

    func takePhoto(completion: @escaping (Result<Data, PhotoCaptureError>) -> ()) {
        if !session.hasCamera {
            completion(.failure(PhotoCaptureError.noCameraSet))
            return
        }
        if session.hasStarted {
            controller.takePhoto(with: settings, handler: captureHandler)
        } else {
            completion(.failure(.cameraNotStarted))
        }
    }
}
Summary
Use cases are huge in scope, and not everything has been covered in this post; not by a long shot. I hope to have passed on an understanding as to why they’re so helpful in not just the engineering portion of building out the code, but also getting you to the point of writing code, by providing a documentation platform to model requirements in, using plain text that all stakeholders can understand.
For further reading on this, I’d recommend checking out the below books, along with the blog posts splattered about in this post:
- Object Oriented Software Engineering: A Use Case Driven Approach
- Where it all started (in print, anyway), written by Ivar Jacobson.
- Growing Object-Oriented Software, Guided by Tests
- Clean Architecture
- Writing Effective Use Cases
In a future post, I’ll dive into some more real world examples of use cases and show you their documented form, as well as how that translates to code.