Currently preparing a large post going over Clean Architecture in iOS and how that relates to modularization, but whilst that is in the making, I figured I’d post about my newly released Camera framework, and some of the architectural decisions made.
Camera aims to provide a singular, well-tested interface for simple camera interactions. Its headless in the sense it does have a preview UI, but its a bring-your-own-UI situation for all the other camera functionality. You’re probably not building the next Halide with this, but it might be perfect if you’re looking for a drop-in Swift Package to take a picture with. Whilst its not feature complete yet, it can currently:
- Show a preview from your selected camera.
- List available cameras on your device.
- Take a picture.
- Allows you to set the file format of the picture you’re taking.
- Handle device rotation.
- Set your flash state – on/off/auto.
So why does this exist?
Motivation for the framework
I’m currently building a little side-project-thing™ (maybe more info on that soon, assuming it gets past the "oh this is exciting!" phase), and surprise-surprise, a large part of it revolves around the use of the camera.
I can’t say I’m an expert in AVFoundation but setting up a camera has always felt like a tedious process to me. I’ve attempted to draw out my understanding of the bits and bobs you need for the setup of showing a camera preview here:
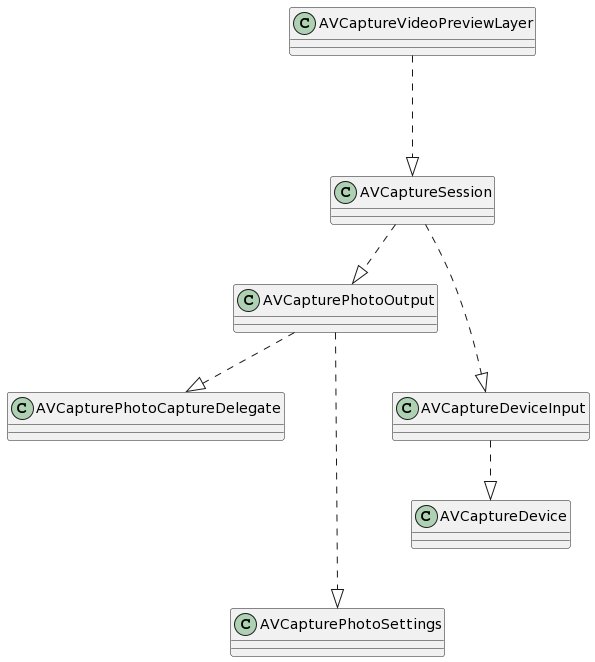
Yeah, not pleasant.
You have to link up quite a few moving parts from different areas of the framework to get something to work. Getting tests around those different moving parts also proves challenging, as there is a blurred line between various boundaries. The below feels particularly egregious from an architectural point of view, and is a good example of a blurred boundary:
The UI layer directly depends upon AVCaptureSession, which is seemingly where the business logic for operating the camera belongs (well, some portions at least – you take a picture via the AVCapturePhotoOutput attached to the session). This means that any changes in AVCaptureSession, have the possibility of cascading down to your UI. And given that AVCaptureSession depends on quite a few other things, its very possible that changes from those other bits-and-bobs will cascade downwards to the UI, despite the UI not directly depending on them.
Ultimately, the motivation for this is that I wanted to abstract away from all the above noise, and provide something simple and well-tested for the app I’m building. A small example of building the API you want, rather than settling for the API thats been given to you.
A peak behind the curtain
Below, I’ll go over some of the architectural decisions around the Camera module.
Building from the outside in
I started out by drawing out the boundary line around the module. I knew I ultimately wanted the following external features for the module (as mentioned above):
- Show a preview from your selected camera.
- List available cameras on your device.
- Set a camera to view the preview of/take a photo with.
- Take a picture.
- Set the file format of the picture you’re taking.
This allowed me to start designing the interface of the module. As of the time of writing, this looks like the below in the Camera protocol (which can be found here):
public protocol Camera {

    var previewView: UIView { get }

    var availableDevices: [Device] { get }

    func start(completion: @MainActor @escaping () -> ())

    func set(_ cameraId: String) throws

    func takePhoto(with settings: CameraSettings, completion: @escaping (Result<Data, PhotoCaptureError>) -> ())
}
CameraSession and CameraController
These are the two main interfaces used internally within the module.
-
CameraSessionis used to represent the state of the camera. For instance, its able to provide a list of cameras that we’re able to use, and then is able to hold onto the camera that we’ve selected from that list. -
CameraControlleraims to represent some of the actions we might want to do with the camera. For the moment, thats just the ability to take a photo, but moving forward, it also might include some other actions like taking a video, or perhaps turning on the flash.
The underlying technology, in this case we used objects from AVFoundation, is then wrapped around both the CameraController and CameraSession interface where appropriate. We’re using the Dependency Inversion principle here. The theory being we can have any technology backing these two interfaces, and nothing consuming them would need to change, pushing AVFoundation to just an implementation detail of the Camera module.
When we need to pass data to these interfaces, we pass domain data models modeled around the Camera module, and the concrete implementations of the interfaces then adapt to AVFoundation objects as required. We do this so the module doesn’t have AVFoundation coupling running through it.
In our tests, we test up until these two interfaces, and spy on them to make sure we’re passing through the correct information.
Use Cases
We then relying on use cases to back the core functionality that we’ve set out above in our API. We’ll have a post up explaining use cases in more detail in the future.
These use cases typically depend on the above CameraController and CameraSession (either one or both of them). These use cases then contain the business logic of the interactions with those interfaces. They also provide a way of neatly documenting the capabilities of the system for those just glancing at the folder directory.
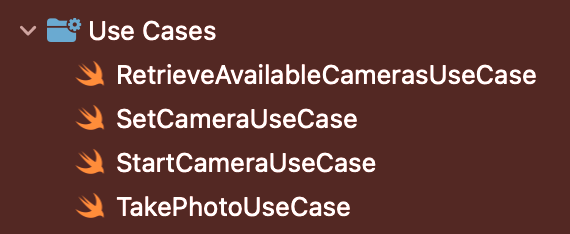
Lets take a further look at this using the TakePhotoUseCase as the example.
TakePhotoUseCase implementation
Our TakePhotoUseCase ends up backing the takePhoto() feature of our API. It sets out to do as the class describes – take a photo using our Camera system.
Initialization
To set up our use case, we pass in two interfaces – CameraController and CameraSession.
private let controller: CameraController
private let session: CameraSesion

init(controller: CameraController,
    session: CameraSesion) {
    self.controller = controller
    self.session = session
}
The meat
Using tests, we then build up the business logic of when to take a photo, and when to provide the consumer with information about an error if something is not setup as expected. The business logic interacts with the injected abstractions as the code below shows (I’m not particularly keen with the number of if‘s here, but will sort that in a future commit!):.
func takePhoto(with settings: CameraSettings, completion: @escaping (Result<Data, PhotoCaptureError>) -> ()) {
    if !session.hasCamera {
        completion(.failure(PhotoCaptureError.noCameraSet))
        return
    }
    if session.hasStarted {
        captureHandler.set(completion)
        controller.takePhoto(with: settings, handler: captureHandler)
    } else {
        completion(.failure(.cameraNotStarted))
    }
}
The long and short of this is:
- If the session hasn’t been provided with a camera, we return a failure.
- If the camera hasn’t started, we return a failure.
- If the above criteria has been met, we attempt to take a photo.
Testing
The other neat thing about use cases is they provide a great starting point for your tests. You’re able to build tests around a full suite of functionality, from the start to the end. In this example, it means we can build a test suit that start from the API (DefaultCamera), right up until mocks of the CameraController and CameraSession interfaces.
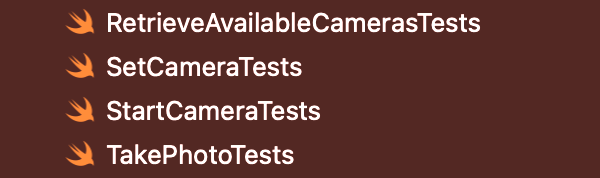
Most of the tests in this project revolve around testing the functionality of the use cases, and are divided up as such.
The end result
The end result of all this is that instead of the consumer of the module having to piece together a load of puzzle pieces to build out a camera in their app, they’re able to grab onto a single object that contains everything they need to interface with the Camera module. A camera can be set up, with a preview shown on screen, with the below code:
let camera = CameraFactory.make()
let selectedDevice = camera.availableDevices.randomElement()

let view = camera.previewView

do {
    try camera.set(camera!.id)
} catch let error {
    print(error)
}

view.addSubview(view)

camera.start {
    // do stuff here
}
And once the setup is complete, you’re able to take a photo with the below:
camera.takePhoto(with: CameraSettings(fileType: .jpeg)) { result in
    switch result {
    case .success(let data):
        let image = UIImage(data: data)
        break
    case .failure(let error):
        break
    }
}
Conclusion
I hope this proved to be an interesting little look at the design of this framework. It attempts to follow a lot of Clean Architecture principles, in order to build something testable and decoupled from the the currently chosen technology detail.